共计 3445 个字符,预计需要花费 9 分钟才能阅读完成。
之前做三项逆变小项目时,需要通过上位机来控制逆变的频率、线电压等。而用 C# 可以快速的搭建简单的图形界面,也可以快速的实现相关功能并生成 .exe 文件在 Windows 上运行。在这里主要分享一下串口的通信如何使用。文末附完整项目文件。
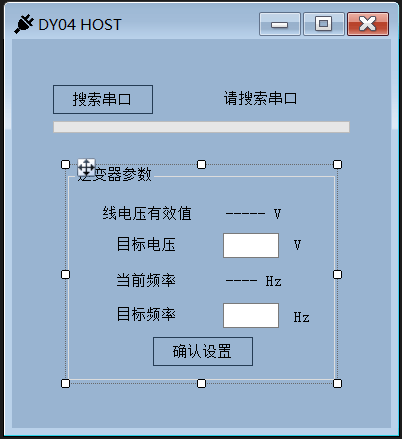
计划中该上位机程序应该包含搜索串口的能力,即和指定的串口通信。此外还能显示当前的电压和频率,并设置新的电压和频率。
首先,搭建好界面框架,这里只需要一个页面就行,也不需要复杂的功能,搭建好界面如下:

左上的按键负责进行搜索串口功能,给它绑定一个事件:
this.ButtonSearchSP.FlatStyle = System.Windows.Forms.FlatStyle.Popup;
this.ButtonSearchSP.Location = new System.Drawing.Point(41, 46);
this.ButtonSearchSP.Margin = new System.Windows.Forms.Padding(4, 4, 4, 4);
this.ButtonSearchSP.Name = "ButtonSearchSP";
this.ButtonSearchSP.Size = new System.Drawing.Size(100, 29);
this.ButtonSearchSP.TabIndex = 0;
this.ButtonSearchSP.Text = " 搜索串口 ";
this.ButtonSearchSP.UseVisualStyleBackColor = true;
this.ButtonSearchSP.Click += new System.EventHandler(this.ButtonSearchSP_Click);
点击事件的处理函数如下:
private void ButtonSearchSP_Click(object sender, EventArgs e)
{
    LabelStatus.Text = " 正在搜索。。。"; // 点击后更改状态标签文字
    string[] serialNames = System.IO.Ports.SerialPort.GetPortNames();

    ProgressBar.Value = ProgressBar.Minimum ;

    // 对每个串口进行判断
    for (int i = 0; i < serialNames.Length; i++)
    {
        ProgressBar.Value += ProgressBar.Step;
        try
        {
            isMatched = false;
            // serialPort 是用来主动通信的串口
            // 声明为 private System.IO.Ports.SerialPort serialPort;
            if (serialPort.IsOpen){serialPort.Close();
            }

            serialPort.PortName = serialNames[i];
            serialPort.BaudRate = 115200; // 我设定波特率为 115200
            serialPort.DataBits = 8;
            serialPort.Parity = System.IO.Ports.Parity.None;
            serialPort.StopBits = System.IO.Ports.StopBits.One;
            serialPort.Open();

            int t1 = 1000*DateTime.Now.Second+DateTime.Now.Millisecond;
            // 试着通信 200ms
            while (1000 * DateTime.Now.Second + DateTime.Now.Millisecond - t1 < 200) ;

            // 读取数据
            int len = serialPort.BytesToRead;
            len = len > 100 ? 100 : len;
            Byte[] readBuffer = new Byte[len];
            serialPort.Read(readBuffer, 0, len);
            serialPort.DiscardInBuffer();  // 清空接收缓冲区

            for (int j = 0; j < len-1; j++)
            {
                // 寻找通信头,这里 13 10 是我设置的通信头,由单片机发出
                // 在识别到 13 10 后,确定是连接单片机的串口
                if (readBuffer[j] == 13 && readBuffer[j + 1] == 10) {
                    isMatched = true;
                break;
                }
            }
            if (isMatched)
            {
                LabelStatus.Text = " 已找到 "+ serialPort.PortName;
                ProgressBar.Value = ProgressBar.Maximum;
                groupBox1.Enabled = true;
                return;
            }
         }
         catch{continue;}
         if (serialPort.IsOpen)
         {serialPort.Close();
         }
    }
    LabelStatus.Text = " 未找到串口 ";
    ProgressBar.Value = ProgressBar.Minimum;
}
同理,”确认设置“按钮也需要绑定一个点击事件,负责将设定的电压频率通知单片机。
private void button1_Click(object sender, EventArgs e)
{
    try
    {
        // 将字符串转换成 double 类型
        double f = Convert.ToDouble(textBox1.Text);
        double v = Convert.ToDouble(textBox2.Text);
        // 预设的变化范围
        if (f> 10 && f < 250)
        {Byte[] sendBuffer = new Byte[6];
            sendBuffer[0] = (Byte)v; sendBuffer[1] = (byte)((v - (double)sendBuffer[0]) * 100 + 0.5);
            sendBuffer[2] = (Byte)f; sendBuffer[3] = (byte)((f - (double)sendBuffer[2])*100+0.5);
            sendBuffer[4] = 13; sendBuffer[5] = 10;
            serialPort.Write(sendBuffer,0,6);
        }
    }
    catch {MessageBox.Show(" 频率范围 10~250 Hz");
    }

}
最后再加上实时显示单片机的传感器数据程序,这个处理函数同样在表单的 Designer 文件中注册:
this.serialPort.DataReceived += new System.IO.Ports.SerialDataReceivedEventHandler(this.SerialDataRecveived);:
private void SerialDataRecveived(Object sender, System.IO.Ports.SerialDataReceivedEventArgs e)
{if (isMatched)
    {
        // 接收数据事件处理
        try
        {
            //BytesToRead 为要读入的字节长度
            int len = serialPort.BytesToRead;
            if (len > 5) {Byte [] readBuffer = new Byte[len];
                serialPort.Read(readBuffer, 0, len); // 将数据读入缓存
                                                     // 处理 readBuffer 中的数据
                serialPort.DiscardInBuffer();  // 清空接收缓冲区

                for (int j = 0; j < len - 1; j++)
                {if (readBuffer[j] == 13 && readBuffer[j + 1] == 10)
                    {if (j >= 4)
                        {float v = readBuffer[j-4]+readBuffer[j-3]/100.0f;
                            float f = readBuffer[j - 2] + readBuffer[j - 1] / 100.0f;
                            this.Invoke(new EventHandler(delegate
                            {
                                label2.Text = v + " V";
                                label4.Text = f + " Hz";
                            }));

                        }
                        else {continue;}
                        break;
                    }
                }

            }
        }
        catch (Exception ex)
        {
            groupBox1.Enabled = false;
            LabelStatus.Text = " 连接中断 ";
        }
    }
}
主要的处理函数流程大致如此。
整个项目文件参考地址如下:
链接:https://pan.baidu.com/s/1MEPvyW25zRNk-lh-0qNk2Q?pwd=h9rf
提取码:h9rf